Vector Operations in Go

I've always enjoyed implementing raytracing algorithms. It is truly rewarding when after hours of brain-twisting programming you can see the result in a form of a beautiful, rendered image.
I've also found that implementing raytracers is the fastest way to learn a new language because it touches on all the basic concepts:
- collections,
- file I/O,
- concurrency,
- packaging and architecture,
- branching, looping, recursion.
The project will be written using TDD where possible. For testing, I will be using the following packages:
- testing - the Go test package,
- testify - from stretchr, mainly the assert package.
Vectors are the core mathematical tool hiding inside the ray tracing algorithm. They allow us to describe relations in a three-dimensional space.
In this blog post, I will describe all of the needed vector operations that will be used in GoRay.
You can view the full code for this post here.
Vector Representation in Go
First thing I need to do is define how vectors will be represented in the code. I'm coming from a highly object-oriented language (ruby) so, naturally, I picked a thing that resembles objects the most - struct (this may not be the Go way, so if you have any other propositions, please ping me).
So, let's define a struct that will represent a three-dimensional vector with coordinates (x, y, z):
[code]
Note that the struct's name and all of the coordinates are written in capital letters. That's because in Go, only the stuff that's written in capital letters gets exported when your package is imported somewhere. Lowercase functions, structs, etc. are available only inside the package. If you want some more information about this, visit this link.
Operations on Vectors
Go allows us to define methods on structs, which seems like a perfect candidate for defining all of the needed vector operations.
Methods are plain Go functions, but they are defined by a receiver that comes before the function name.
We can define a method on a receiver in two ways:
- pointer receiver,
[code]
- value receiver.
[code]
The core difference between these two is that the one that is defined on a pointer receiver will mutate the actual object it was called on. Analogically, a method called on a value receiver will not mutate the receiver because it will operate on a copy of the original receiver.
All of the methods that will be presented in this post are defined on a value receiver. A new Vector will be returned where applicable.
This type of notation allows for a verbose representation of the equations used in the ray tracing algorithm.
With the technicalities out of the way, let's move on to implementing the actual vector operations.
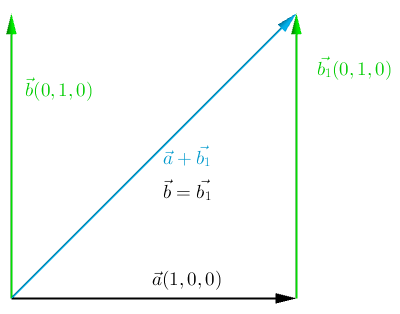
Adding Two Vectors
This operation is achieved by adding the corresponding coefficients of two vectors together.
Geometrically, it looks like this:

[code]
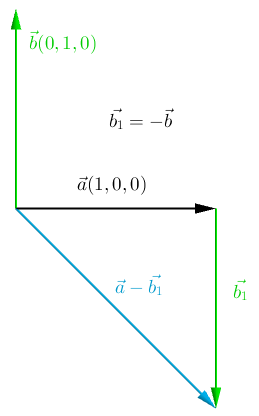
Subtracting Two Vectors
Subtraction is similar to addition, with the difference that we add a negated vector:

Analogically to the addition of two vectors, we subtract the corresponding coefficients of two vectors:
[code]
Multiplying Vector by Scalar
Multiplying by a scalar can be interpreted as scaling the vector (modifying its length). This operation is also pretty straightforward, as we have to multiply each coefficient by the scalar:

[code]
As a bonus, we also get division by a scalar, by multiplying by 1/s
Dot Product of Two Vectors
The dot product is the first operation that doesn't return a Vector. It returns a scalar value of type float64.
This operation is particularly important in the context of the ray tracing algorithm because of its common use in the equations.
Its algebraic definition is as follows:
It's a simple equation, we multiply corresponding coefficients of both vectors, and then sum those multiplications. But this definition isn't of much use in the context of ray tracing algorithm. What we need here is the geometric definition:
The notation ||A|| means length of vector A (more on that in a sec). θ is the angle between the vectors. The fact that we use the cosine function gives us some interesting cases:
- When the vectors are orthogonal, the angle between them is 90°. This means that the cosine is 0 and the whole dot product is 0.
- When the vectors are codirectional, then the angle between them is 0°. This means that the cosine is 1 and the dot product evaluates to:
These two cases give us a way to determine if two rays are orthogonal or codirectional, which means a lot when evaluating materials of objects.
With the theoretical stuff out of the way, let's proceed with the implementation:
[code]
Pretty simple, eh?
Length of a Vector
As stated earlier, we denote the length of an A vector like this - ||A||. Its algebraic definition is as follows:
As you can see, it's basically a dot product of a vector with itself, under a square root.
So, we can use the already implemented `Dot` method to implement this one:
[code]
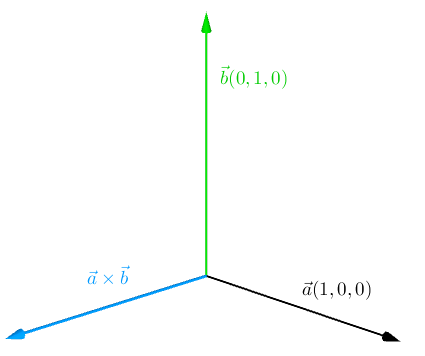
Cross Product of Two Vectors
Unlike the dot product, the cross product returns a new vector that is perpendicular to the other two.
Additionally, this operation is defined in R3
The cross product can be also used for calculating a surface normal (the surface that is defined by the two vectors).

The cross product formula is somewhat hard to remember:
The implementation looks like this:
[code]
Normalising a Vector
Also called calculating a unit vector - versor:
All we have to do is divide (multiply by 1 / x) each vector component by the length of the vector:
[code]
Summary
Now that we have the basic math implemented, we will move to the more exciting stuff. Stay tuned.


