A Good Start In React Native

In both cases, you are welcome and this article is for you!
Half a year ago I had nothing in common with JS, but I successfully made the transition. Now, I can share some hints that could save you from several mistakes I made. This article doesn’t go deeply into details, but rather is a brief and broad introduction to RN. I also provide links to more detailed resources.

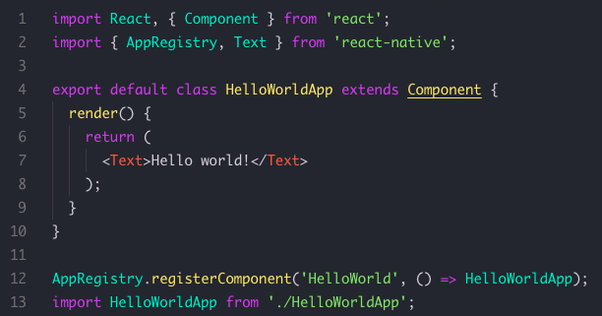
Just an RN example of a “Hello World” app
Motivation
First, let me give you some background about why I decided to change my technology of choice regarding mobile app development. I have experience with both native development (iOS and Android) as well as with cross-platform development using Xamarin and Unity. I liked all these technologies, but I was looking for something fresh for app development, something that would allow me to combine what I already knew. I believed that cross-platform development for sure was the way to go. I chose to learn about React Native.
When I first used it, I was totally confused. It was not like anything I used before. Different language, different environments, a paradigm shift. It took me some time to get used to the new technology, but now I’m sure I made the right choice to transition to RN.
If you are scared of JavaScript - don’t be. In the past I heard lots of negative opinions about JavaScript, but the modern standard (ES6) has changed a lot for the better. Also JS is the most popular language used, because of which its community is huge. There are also lots of good quality packages in npm that can be reused in RN apps.
What is React Native
First things first. What is React Native? You probably already know it’s a React-based framework, used for developing cross-platform apps with JavaScript. RN uses a different rendering mechanism than React.js (also called React Web). Components, which are the main building blocks of an app, are translated into native mobile views: UIView on iOS or View on Android.
Cross-platform frameworks that make use of JavaScript, HTML and CSS are often accused of not having the native feel and/or suffering from numerous performance issues. While it’s usually true for frameworks that render views in a WebView, it doesn’t apply to React Native.
To us, native developers, it’s especially important to understand what Native stands for in React Native. It represents rendering of native views, which is a good thing. A bad thing is that it still runs not-so-native JS, instead of faster native code. Fortunately, usually it’s hard to spot a performance difference.
If you want to dig into details, we compared two identical apps, one written in Swift and the other one with RN, and wrote a story about it.
How to start
Guides
When I was taking my first steps in React Native I have read many guides and I can especially recommend these two:
- The official React Native “Getting Started” guide by Facebook is an awesome resource for first steps. It’s up-to-date and well-organized. At the very beginning of this guide you have to choose a toolchain: React Native CLI or Expo. However, I advise you to not use Expo in the long run. Expo is easier at the very beginning but becomes troublesome later, as not all dependencies and native modules work well with it. You, as a native developer, should think about the possibility of reusing what you already know from the native world and not limit your options with Expo. Fortunately, you can always “eject” your code from Expo into a pure RN project that will work with the standard React Native CLI. When using React Native CLI you will learn more and your project will not suffer from Expo’s limitations.
- Another good guide is “React Native Express”. This one is interactive. It starts with the basics of JavaScript and then goes on to more advanced topics, such as Redux and Animated API.
If you are craving more knowledge, we have also written up a broader selection of tools and resources that were considered the most useful by my colleagues. It’s available in this Codestories blog post.
Tools
You can write RN apps using any text editor or IDE you like. Currently the most popular tool among RN devs is Visual Studio Code. It’s highly customizable and gives access to lots of extensions. The other popular IDE worth trying is Deco. Just use whatever you feel fits you better.
When it comes to debugging you can just use your browser (Chrome DevTools), but there are more powerful alternatives available. One of them is React Native Debugger, which runs as a standalone app. Beside a must-have debugger console, it gives you the tools to easily analyze the stored state of the app or view components’ hierarchy.
While it’s an awesome debugger that often saves a lot of time, it unfortunately has a small downside: it awfully slows down the running app. My hint for you is to use it when you really have to debug something non-trivial, otherwise use the default debugger in the browser.
We have published a blogpost that goes more into details of debugging. There, you can read about another powerful tool – Reactotron. It has a slightly different approach to debugging and runs faster than React Native Debugger.
In case of the most complex issues, you can still profile and debug using Xcode and Android Studio you are already familiar with. They are the best when you need to profile performance or solve weird rendering issues.

It really renders native views. The screenshot above, in case you didn’t believe me, shows the captured view hierarchy in Xcode. Android Studio offers similar functionality.
Navigation
One of the first steps in a new RN project will be choosing a navigation library. The choice is not simple, as there is no official RN navigation and many libraries are competing. These are the two I think are the most commonly used:
- The most popular library is probably react-navigation. It has an opinion of being relatively easy but not the most performant, because it doesn’t display native navigation components.
- Another popular one is react-native-navigation (created by wix). If you have a native background you should definitely try this library as it’s more customizable and uses truly native navigation components.
Calling native code and performance
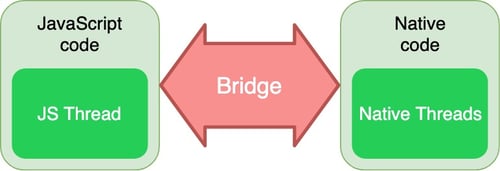
Basically, in RN apps code can be split into two worlds: JS and Native. Yes, obviously you can call native code from JS. React Native, through the Bridge, exposes JS interfaces to the native platform’s API. This means that the app can use native features, such as the camera, Bluetooth, and GPS.
Separately, code in each one of these JS and Native worlds runs fairly quickly, but sometimes there is a need for communication between them, which unfortunately is slow. The Bridge works as a translator between the two worlds.

Diagram illustrating the Bridge between JS and native code
An interesting example of this concept is how the standard list structure (FlatList) is implemented in RN, because it’s different from what I initially expected. FlatList does not reuse a native class, such as RecyclerView on Android or UITableView on iOS, but instead is implemented from scratch using JavaScript to limit calls through the Bridge. When this communication happens often, code written purely in JS will run faster than code that runs logic on the native side behind the Bridge.
Knowing this you should try to limit the number of calls through bridge to a minimum. The official documentation (iOS, Android) is also a fairly good resource explaining the details of native modules.
Usually you don’t have to go very deep into the native world, because this unique native feature you need is probably already implemented by some package in npm. As I said previously, the JS and React Native communities are huge and active so chances are it’s already done.
Lifecycles
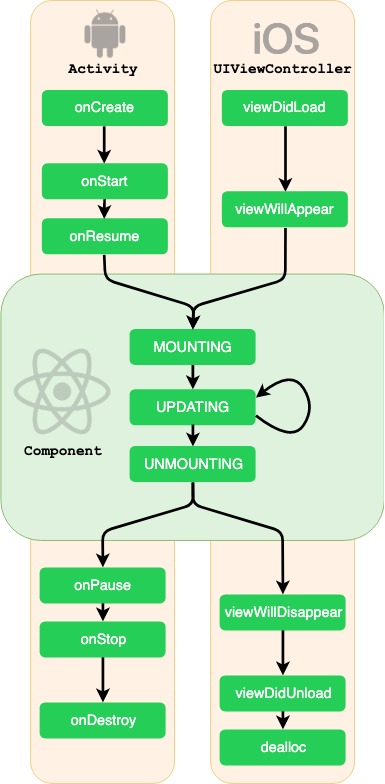
At the very beginning of my adventure with RN it was hard for me to understand the Component lifecycle. It’s probably because I expected it to look similar to native lifecycles. Well, as you guessed, it’s pretty different. In fact, in RN our views have two lifecycles: the native lifecycle of UIViewController on iOS or Activity on Android wraps the Component lifecycle.

Diagram presenting the phases of the RN Component lifecycle inside native lifecycles.
Let’s continue looking at the examples of UIViewController on iOS and Activity on Android. Their lifecycles span over their lives similarly to how a movie would go from the very beginning to the end. This is different from Component, whose Updating phase lifecycle looks more a single frame from a movie.

Diagram showing the detailed lifecycle of React.Component (source)
The Mounting phase of Component is done only once per its wrapping native view’s lifespan. After the componentDidMount call we know that the Component is bound to a native view and is first rendered using the initial props and state. Here are some links to the official docs explaining props and state.
The next phase is Updating. This is the phase I compared to a single movie frame. Component runs through this phase every single time it has received new props or its state has changed, and these are the only conditions when it can be re-rendered. After each update a new movie frame is rendered.
In the Unmounting phase after the componentWillUnmount call we know that Component will soon be detached from the native view.
It’s worth noting that when learning you will probably find resources that present the legacy lifecycle of Component. Remember that componentWillMount, componentWillReceiveProps and componentWillUpdate are considered obsolete since React v16.3.0 (released on 29 Mar 2018).
Architecture
For me, the most apparent difference between developing a completely native app and an RN app was the totally different architecture. Native iOS and Android projects are usually written using one of the popular architectural patterns: Model-View-Something, VIPER or similar.
The architectural patterns that are the most commonly used in native development usually just do not fit the React.Component lifecycle. This is why usage of state containers as Redux is so popular in RN.
Worth noting that in native worlds the MVI paradigm is getting more and more attention. In fact, MVI implements the Flux concept, so it’s quite similar to most of RN apps architecture.

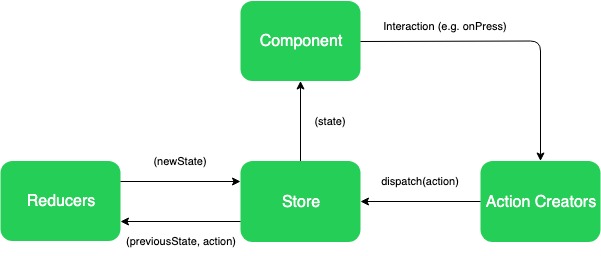
Diagram illustrating the most popular architecture for RN apps - Redux
As RN is based on React.js it also uses a lot of its tools. The most notable part is the usage of state management libraries, from which the most popular one is Redux. It’s possible to write React apps without it, but if you want to become an RN dev you really should understand Redux. Read this article if you want a detailed answer why Redux is that beneficial for a RN app.
Summary
The RN environment may seem totally different from what you know from native iOS or Android, but I hope that with this guide the transition will be easier. Your career and satisfaction can benefit a lot from learning something new, especially if you are bored with your current technology or just looking for a new challenge.
Did you find this article helpful? I would be extremely happy if you liked or shared it with friends.
What was different in RN from what you initially expected? Do you want us to describe something in detail? Feel invited to write your thoughts in the comments section.
Good luck with your React Native adventure! I’m sure you will like it!


